Build Your First AI Prototype in 30 Minutes!
Why AI prototyping is one of the most important skills right now
AI has inverted the traditional product development risk profile.
In classic software, feasibility risk was mostly technical: could you build it, could you scale it, could you maintain it.
With AI, feasibility risk is behavioral. Models look confident even when they are wrong. They appear capable until they quietly fail under edge cases, ambiguity, or long-context pressure.
That creates a dangerous illusion: teams think they’re further along than they actually are.
This is why AI prototyping has become a critical skill for PMs, founders, and engineers. It is the only reliable way to separate:
Model capability vs. model confidence
Demos vs. production reality
Promising behavior vs. trustworthy behavior
Without strong AI prototyping discipline, teams tend to do one of two things:
They either over-invest too early and discover fatal flaws too late or…
They under-invest because they never built enough evidence to justify moving forward.
Good AI prototyping prevents both failure modes.
What AI prototyping actually is (and what it is not)
Most people misunderstand AI prototyping because they treat it like traditional product prototyping: a quick UI, a demo flow, maybe a slick walkthrough to show stakeholders that “the AI works.”
That is not AI prototyping.
An AI prototype is a learning and discovery instrument designed to surface risk early. Its job is not to impress. Its job is to invalidate assumptions as fast as possible.
At its core, AI prototyping exists to answer a very specific set of questions before you invest in scale, optimization, or production architecture:
Can the model actually do what we think it can do?
How reliable is it across real-world inputs, not just happy paths?
What does it cost in normal and worst-case scenarios?
How does it fail, and how dangerous are those failures?
Only once those questions are answered can you meaningfully talk about business value, user trust, or technical feasibility. Until then, everything else is theater.
This is why AI prototyping is not about building features.
It is about reducing uncertainty.
Now, we’re not just going to share the process, we’ll also walk you through the actual prototype we built for this specific newsletter, complete with screenshots and live testing.
(We’re also working on another complex AI prototyping workflow & guide, so stay tuned)
Section 1: The AI prototype development process (how uncertainty is reduced)
Section 2: AI Prototyping Execution & flow
Section 3: Building a real AI prototype (step-by-step workflow)
Section 4: Real Time Output of our prototype
Section 1: The AI prototype development process (how uncertainty is reduced)
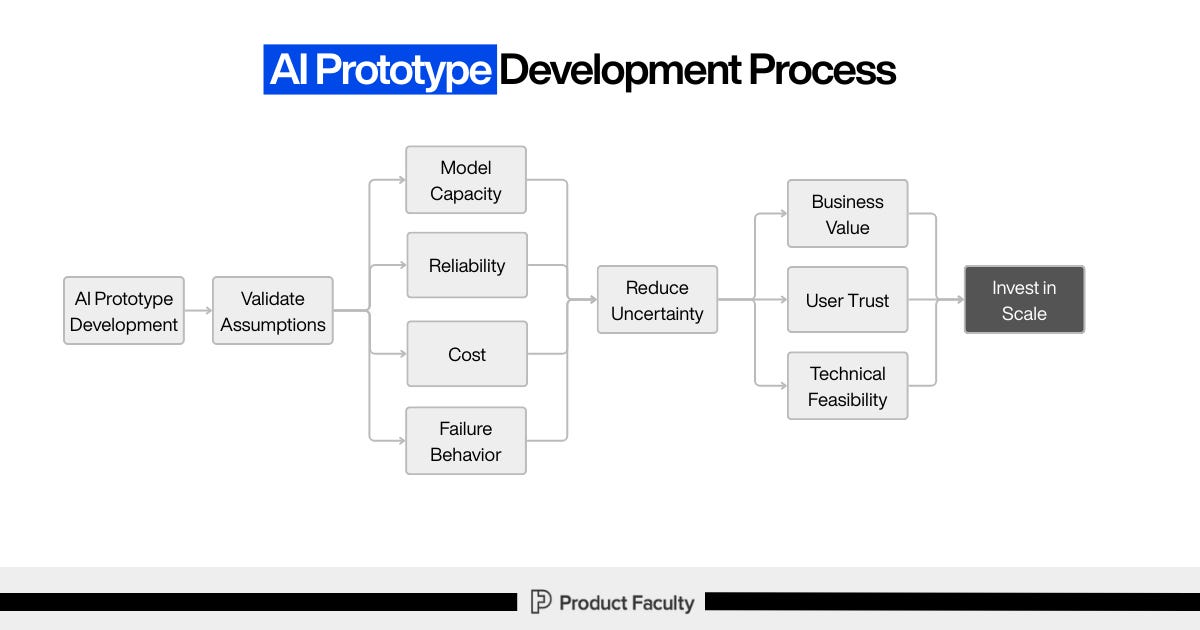
The process you outlined makes one thing very clear: AI prototypes exist to validate assumptions, not outputs.
Everything starts with AI prototype development, but the immediate goal is not value creation. The immediate goal is assumption validation.
From there, the prototype is explicitly used to test four dimensions:
Model capability: Can the model perform the task at all, and under what conditions does that capability break?
Reliability: Does it behave consistently across variations, or does performance collapse unpredictably?
Cost: What does usage look like when scaled, and where do worst-case scenarios emerge?
Failure behavior: How does the system fail, how visible are those failures, and how dangerous are they?
This is the most important part of the flow: these signals are not evaluated in isolation. They are used to reduce uncertainty.
And only once uncertainty is reduced do we earn the right to make higher-level decisions about:
Business value
User trust
Technical feasibility
Those, in turn, inform a single downstream decision: whether it is rational to invest in scale.
The discipline here is intentional. The prototype is not trying to prove success. It is trying to prove truth.
Section 2: AI Prototyping Execution & flow
Inside our #1 AI PM Certification’s AI Build Labs live sessions, we dive deep into AI prototyping, vibe-coding, and eventually using these AI coding tools to build fully functional & production-ready AI products from scratch.
The main thing we always convey to students while teaching this flow: Think of this as a risk-reduction machine that forces you to answer the questions AI teams usually avoid until production punishes them:
Does the model actually have the capability we’re assuming?
Will it behave reliably across messy, real inputs?
What does it cost, and what’s the worst-case bill?
How does it fail, and will users trust it when it does?
Do we have enough evidence to invest in scale, or are we kidding ourselves?
Everything in the flow exists to make those uncertainties visible early.
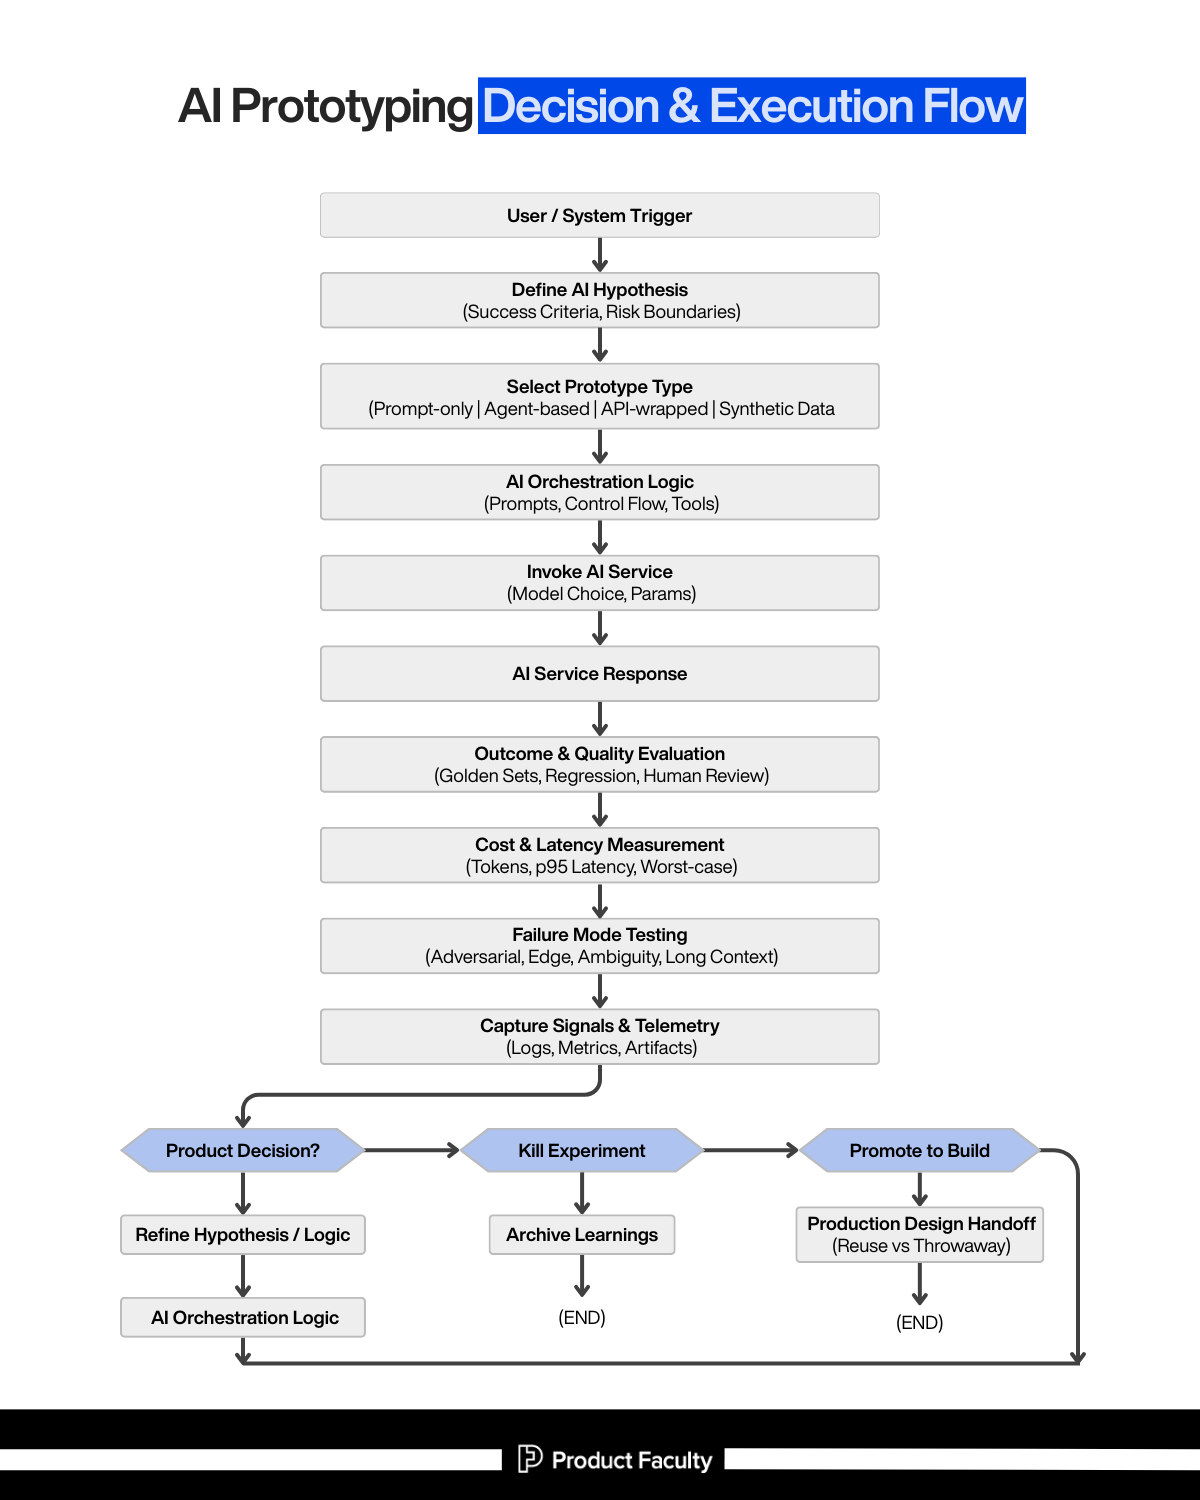
Step 1: User / System Trigger
What it is: The real-world moment that creates demand for “AI doing something.”
It can be:
A user action (“summarize this”, “draft a reply”, “classify this ticket”)
A system event (new support ticket, new document uploaded, fraud flag, a scheduled job)
Your trigger defines the operating conditions of the system. AI behavior is extremely sensitive to context: input length, format, ambiguity, time pressure, and downstream consequences. If you don’t anchor the prototype to a real trigger, you end up prototyping in a fantasy environment.
Step 2: Define the AI Hypothesis (Success Criteria, Risk Boundaries)
This is where most teams skip ahead… and then spend weeks “prompting” without knowing what they’re optimizing for.
Success criteria means you define what “good” looks like in a way you can test.
Examples:
Accuracy threshold on a golden set
Must cite evidence from the provided context
Must produce structured output with specific fields
Must stay under a latency budget (p95 < X seconds)
Must keep cost under $Y per 1,000 requests
Risk boundaries means you define what the system must never do, or how it must behave when uncertain.
Examples:
If confidence is low, it must ask a clarifying question
If it can’t find evidence, it must say “I don’t know”
It must not output sensitive data
It must not take irreversible actions without human approval
Why this step is non-negotiable: AI prototypes are seductive. You can always find a demo that looks impressive. Hypotheses and boundaries keep you honest by forcing the prototype to produce decision-grade evidence instead of vibes.
Step 3: Select Prototype Type (Prompt-only | Agent-based | API-wrapped | Synthetic Data)
This is about choosing the fastest path to the right kind of learning.
Prompt-only prototype: Use when your biggest unknown is: “Can the model do the core cognitive task at all?”.Fastest to build, highest learning density, but easy to overtrust because it hides orchestration and system constraints.
Agent-based prototype: Use when the task requires decomposition, tool use, memory, retrieval, multi-step reasoning, or iterative planning. This surfaces a different risk: compounding errors. Agents don’t fail once, they fail gradually and convincingly.
API-wrapped prototype: Use when integration constraints matter early: latency, request limits, output schemas, monitoring hooks, user-facing guardrails.
This is where prototypes start resembling real systems.Synthetic data simulations: Use when real data is unavailable, sensitive, expensive, or future-state. This is how you test behavior before reality fully exists, but you must be careful: synthetic data can also create false confidence if it doesn’t resemble real-world mess.
Step 4: AI Orchestration Logic (Prompts, Control Flow, Tools)
This is the part most people underestimate. The model is rarely the product. The orchestration is.
Orchestration includes:
The prompt(s) and system instructions
Input shaping (what context you include, what you exclude)
Tool selection and sequencing (search, retrieval, code execution, DB calls)
Control flow (if/then paths, fallbacks, retries, escalation rules)
Output contracts (schemas, formatting, validation)
Many failures people blame on “the model” are orchestration failures:
Wrong context
Missing constraints
No fallback when ambiguous
No verification loop
No structure in outputs
A good prototype proves not only that the model can answer, but that the system can consistently produce usable outputs.
Step 5: Invoke AI Service (Model Choice, Params)
Now you actually call the model. But this step should be treated like a controlled experiment, not a default.
Decisions here include:
Which model class (small/fast vs large/smart)
Temperature / randomness
Max tokens
Tool calling settings
System prompt strategy (single prompt vs multi-pass)
Why it matters: Model choice and parameters directly shape:
output variance (reliability)
cost profile (tokens)
latency profile
failure modes (hallucination vs refusal vs truncation)
This step turns AI from “magic” into a measurable component in a system.
Step 6: AI Service Response
This is the raw outputbut in this flow, you don’t treat the output as “the result.”
You treat it as:
a candidate response
a piece of evidence
something that must be evaluated before trust is granted
In production-grade prototyping, the response is never the end of the process, it’s the start of verification.
Step 7: Outcome & Quality Evaluation (Golden Sets, Regression, Human Review)
This is where you turn “it seems good” into “we have proof.”
Golden sets: A curated set of representative inputs + expected outputs (or scoring rubrics). This is your benchmark for quality and progress.
Regression testing: Every time you change the prompt, orchestration logic, model, or retrieval strategy, you re-run the golden set to ensure you didn’t break something silently.
Human review: Humans catch nuance that automated evals miss, especially:
tone correctness
subtle factual errors
missing business context
dangerous but plausible hallucinations
Without evaluation discipline, prototypes “improve” by accident and degrade without anyone noticing. This is exactly how teams ship systems that look smart but behave unpredictably.
Step 8: Cost & Latency Measurement (Tokens, p95, Worst-case)
AI prototypes that don’t measure cost/latency are basically lying.
You measure:
Token usage per request (input + output)
Latency distributions (not averages… p95/p99)
Worst-case scenarios (long docs, complex prompts, retries, tool calls)
Then you apply mitigation ideas like:
caching strategies
prompt compression
context trimming
model downgrades for low-risk tasks
partial results or progressive responses
Step 9: Failure Mode Testing (Adversarial, Edge, Ambiguity, Long Context)
This is where you deliberately try to break the prototype, because production users absolutely will.
Adversarial inputs: Prompt injection, malicious instructions, misleading context.
Edge cases: Rare formats, partial inputs, weird punctuation, mixed languages, missing fields.
Ambiguity: Inputs with unclear intent, conflicting requirements, underspecified tasks.
Long-context degradation: As context gets longer, models often stay confident while evidence gets weaker, this is a known trap. Your prototype must detect and manage it rather than blindly “answer anyway.”
Trust is built less on how the system performs on normal inputs, and more on how gracefully it behaves when things go wrong.
Step 10: Capture Signals & Telemetry (Logs, Metrics, Artifacts)
This is what makes iteration intelligent rather than random.
You capture:
raw inputs and outputs (with privacy controls)
intermediate tool calls
eval scores
failure categories
cost + latency per run
artifacts like prompts, datasets, and test results
The best AI teams don’t “feel” their way forward. They build feedback systems that tell them exactly why performance changed and what kind of failure is occurring.
Step 11: Product Decision (Iterate | Kill Experiment | Promote to Build)
This is the decision gate that prevents prototype theater.
Iterate
If the hypothesis is promising but not yet reliable/cost-feasible, you refine:
hypothesis (tighten success criteria)
orchestration logic (add constraints, add fallbacks, improve retrieval)
evaluation set (make it more representative)
Then the flow loops back, intentionally.
Kill experiment
If capability is fundamentally insufficient, failure modes are unacceptable, or cost/latency makes it non-viable, you stop.
But you don’t just stop, you archive learnings so the next attempt is smarter.
Promote to build
If the prototype consistently meets success criteria within risk boundaries, and the cost/latency profile is survivable, you move forward.
And importantly: “promote” doesn’t mean “ship the prototype.” It means you’ve earned the right to design a production system.
Step 12: Production Design Handoff (Reuse vs Throwaway)
This is where you prevent prototype debt.
You explicitly decide:
What is throwaway (hacky glue code, temporary prompts, quick scripts)
What is reusable (datasets, eval harness, telemetry patterns, orchestration patterns that proved stable)
Why it matters: Prototypes are allowed to be messy, but production cannot be built on lies. The handoff forces you to separate “learning scaffolding” from “production foundation.”
The meta-lesson of the whole flow
This process is basically a refusal to be fooled by a good demo.
It makes sure:
Intelligence is testable
Failures are observable
Costs are measured
Decisions are intentional
And once you operate like this, AI prototyping stops being “prompting until it looks good,” and starts being what it should be: a disciplined way to decide what’s worth building.
Section 3: Now we’re going to build a real AI prototype
Up to this point, we’ve defined AI prototyping as a way to surface risk early and reduce uncertainty before investing in production systems.
Now we’re going to actually do it (we’re using Replit)
In this walkthrough, we build a real AI Research Assistant prototype, end to end, using a disciplined execution pipeline. This is not a demo and not a toy. Every step exists to make AI behavior observable, debuggable, and decision-ready.
We start with a clear hypothesis:
An AI Research Assistant can take a research question, return a structured summary with key points, and accurately report its own confidence level (high, medium, or low), so users understand when to trust the output.
That belief is what the prototype is designed to test. Nothing more. Nothing less.
System Prompt
SYSTEM DESCRIPTION:

Create a simple web app with:

1. A minimal UI where a user enters a research question

2. A backend endpoint that processes the request step-by-step

3. A visible AI model call

4. Explicit evaluation, cost, and failure logging

EXECUTION FLOW (LOG EACH STEP CLEARLY):

STEP 1: Log when user input is received

- Print the raw input

STEP 2: Assemble the system + user prompt

- Print the full assembled prompt exactly as sent to the model

STEP 3: Log model configuration

- Model name

- Temperature

- Max tokens

STEP 4: Invoke the AI model

- Measure and log start time

- Call the model

- Measure and log end time

STEP 5: Log raw AI response

- Print the response exactly as returned (no cleaning yet)

STEP 6: Validate output structure

- Check if the response is valid JSON

- Log PASS or FAIL

STEP 7: Evaluation logging

- Log simple evaluation fields:

  - relevance (manual score placeholder)

  - clarity (manual score placeholder)

  - confidence_level

STEP 8: Cost and latency logging

- Log token usage if available

- Log total response time in milliseconds

STEP 9: Failure handling

- If input is ambiguous or output is invalid:

  - Log a clear failure message

  - Do NOT crash the app

STEP 10: Final decision log

- Log one of:

  - ITERATE

  - STOP

  - ESCALATE

- Include a short reason

TECHNICAL CONSTRAINTS:

- Use only one backend file if possible

- Use simple console.log / print statements

- No advanced frameworks

- No async abstractions beyond what is necessary

OUTPUT:

- The app should run end-to-end

- Console output should clearly show all steps in order

- Code should be easy to read and disposable
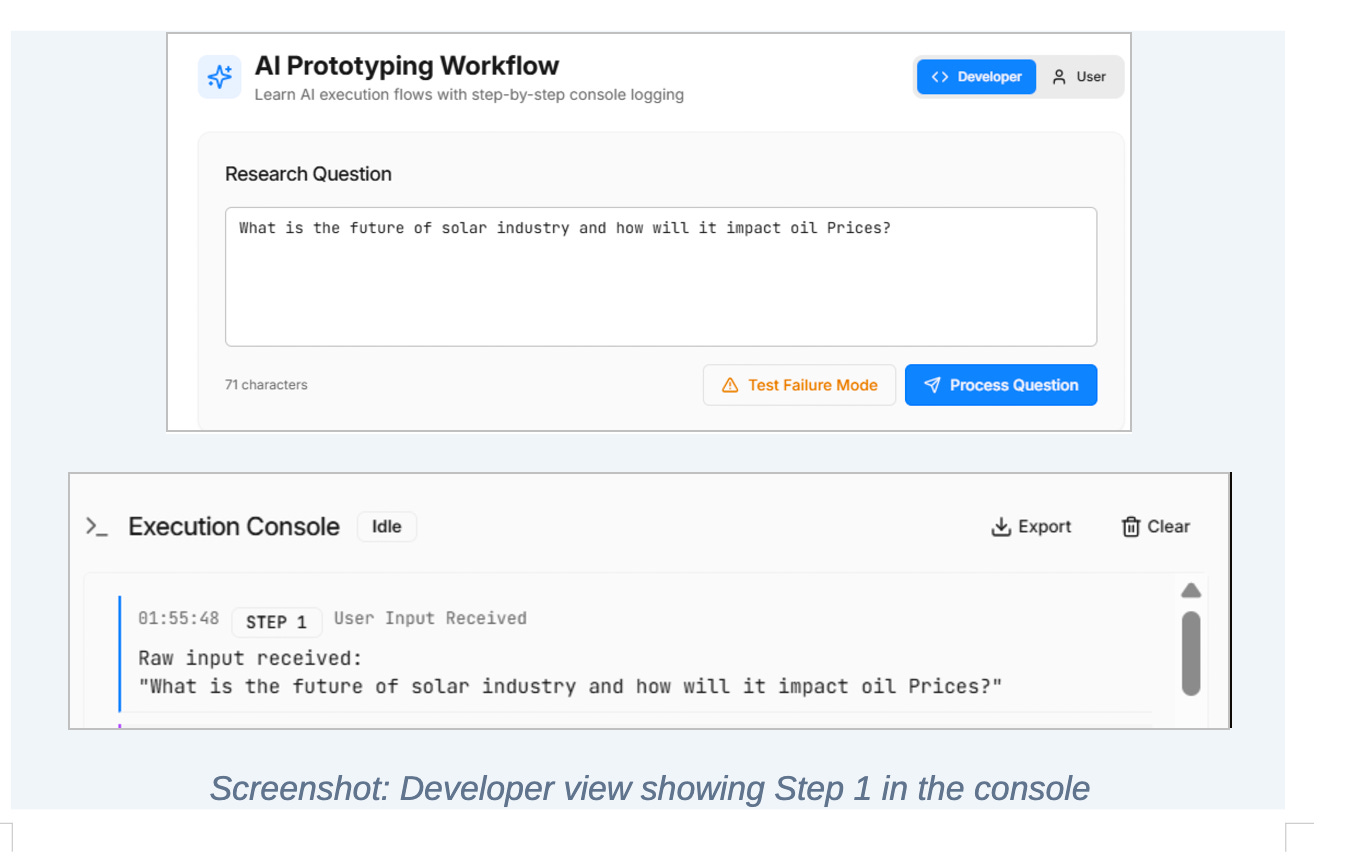
Step 1: User input is received
The system begins by capturing the raw user input exactly as it is received.
No transformation happens here. No interpretation. No cleaning.
This step exists to create an audit trail. When an AI system behaves unexpectedly, the first thing you need is the exact input that triggered the behavior. Without this, debugging becomes guesswork.
AI failures are rarely obvious. Logging input upfront ensures every downstream decision has a concrete reference point.
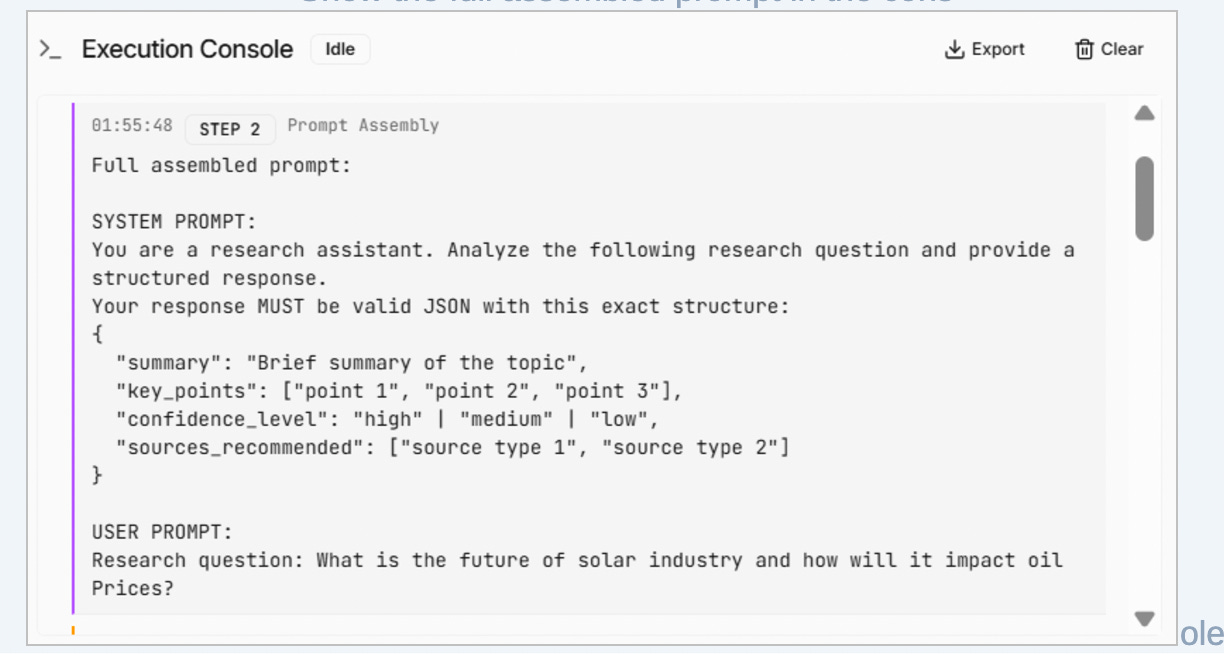
Step 2: Prompt assembly
Next, the system assembles the full prompt that will be sent to the model.
This includes both the system instructions and the user’s question, combined into a single, explicit request.
This step treats the prompt as a contract, not a suggestion. It defines the expected structure of the output, the reasoning constraints, and the requirement for the model to report its own confidence.
By logging the fully assembled prompt, the system ensures that every response can be traced back to the exact instructions that produced it. This is critical for diagnosing regressions and understanding why behavior changes over time.
Step 3: Model configuration
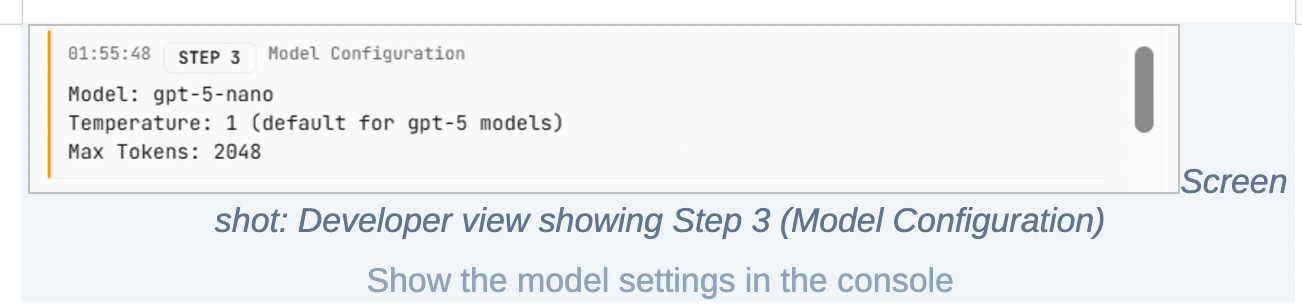
Before invoking the model, the system records the configuration used for the request.
This includes the model choice, temperature, and token limits.
AI behavior is highly sensitive to these parameters. Small changes can significantly affect output quality, consistency, cost, and latency. Logging configuration makes the system’s behavior reproducible and prevents “it worked yesterday” situations where no one knows what changed.
Step 4: Model invocation
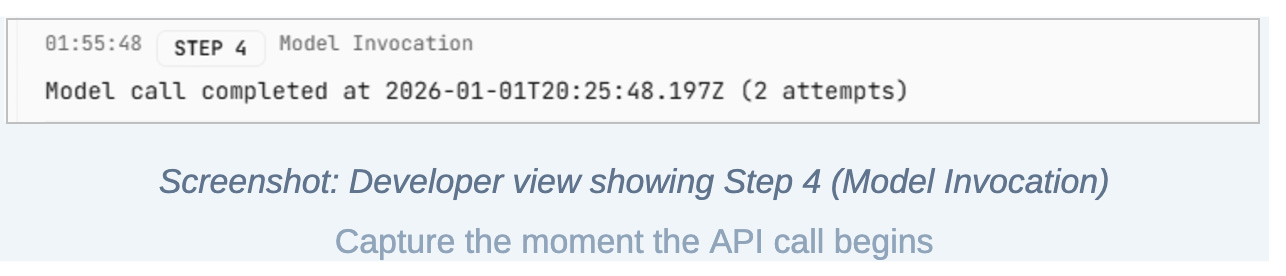
The system now invokes the AI model and measures execution time.
This is where intelligence enters the pipeline, but it is still treated as a controlled experiment. Latency measurement begins before the request and ends when the response is received.
Even at the prototyping stage, response time matters. If an AI system cannot respond within reasonable bounds now, it will not magically become usable later without architectural changes.
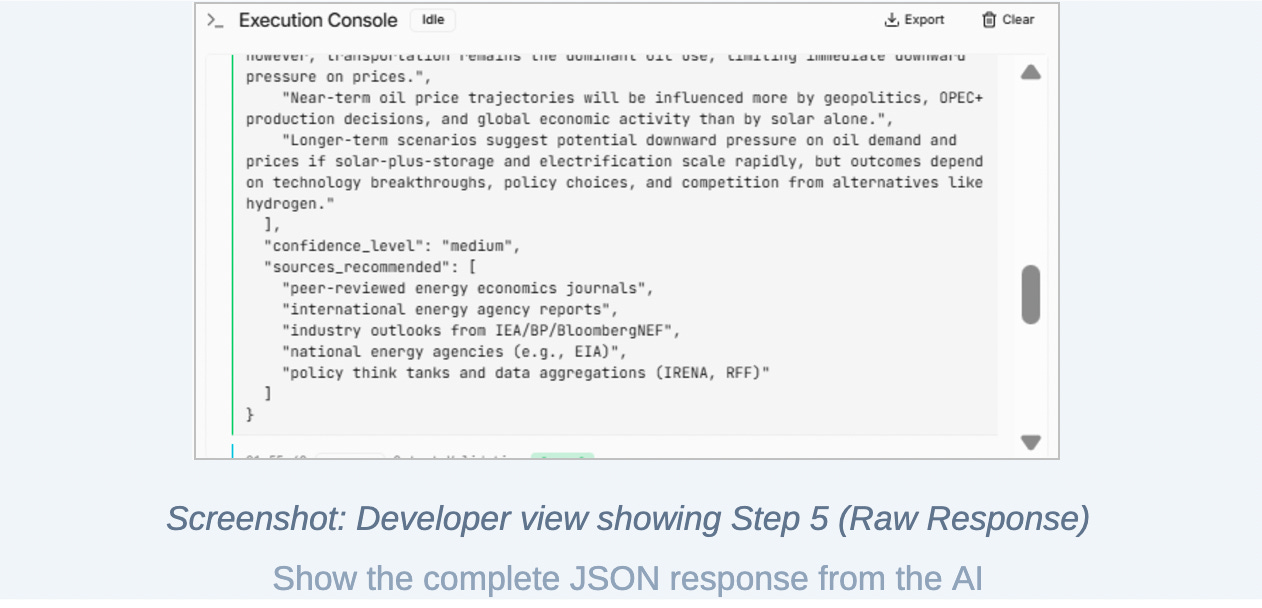
Step 5: Raw AI response
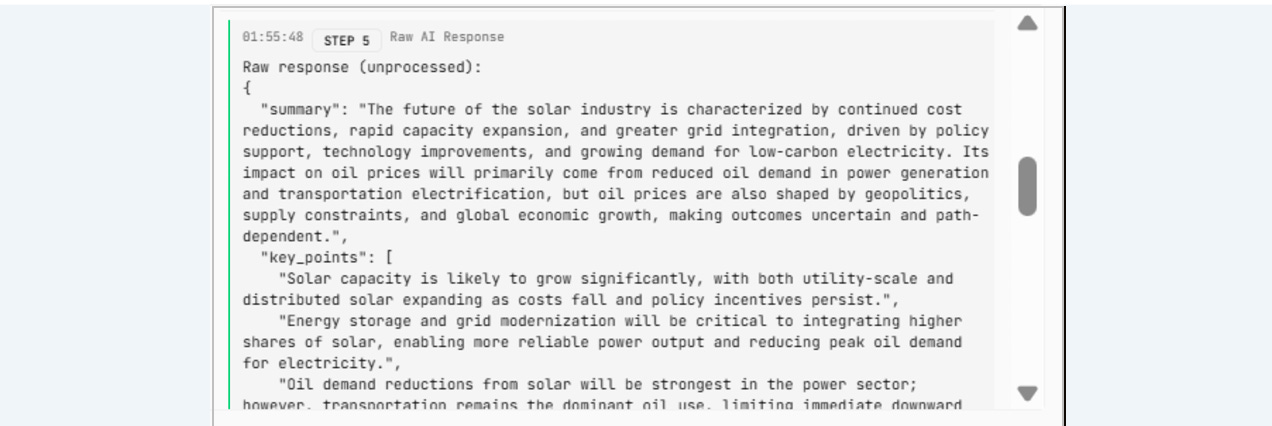
When the model returns a response, the system logs it exactly as received.
No parsing. No validation. No cleanup.
This step preserves the ground truth of what the model actually produced. Many AI failures are introduced during post-processing, and without access to the raw response, it becomes impossible to determine whether the model or the system logic is at fault.
This separation is essential for honest evaluation.
Step 6: Output validation
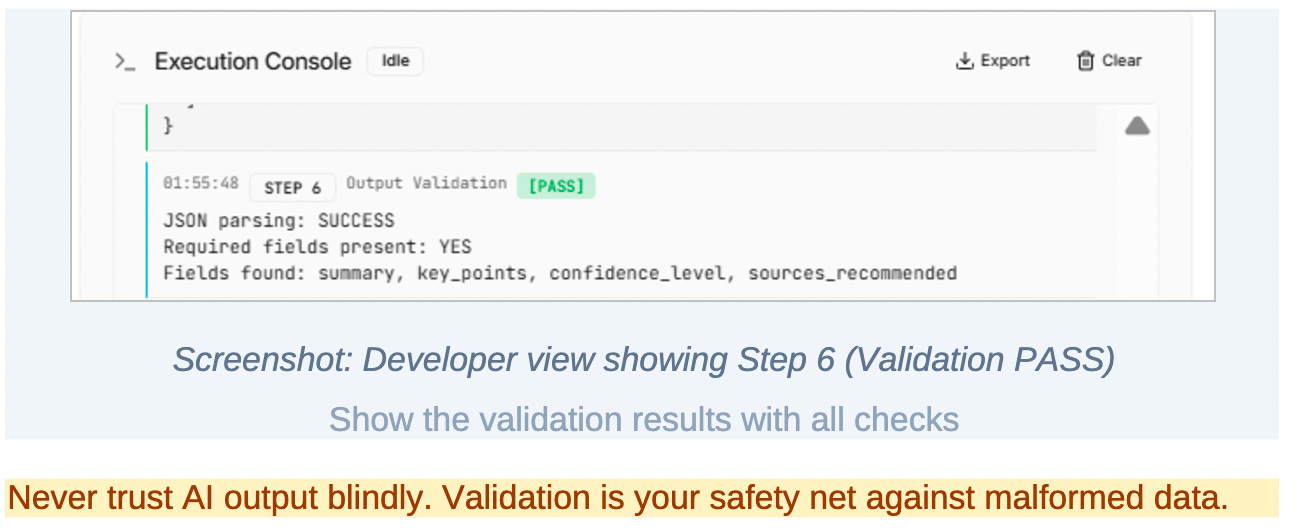
The system then validates the structure of the response.
In this prototype, that means checking whether the output conforms to the expected JSON schema and includes the required fields.
Validation is a hard gate. If the response does not meet structural requirements, it is treated as a failure regardless of how “good” the content appears.
This step exists because AI output is probabilistic. Structure cannot be assumed. Trust must be enforced through verification, not optimism.
Step 7: Evaluation metrics
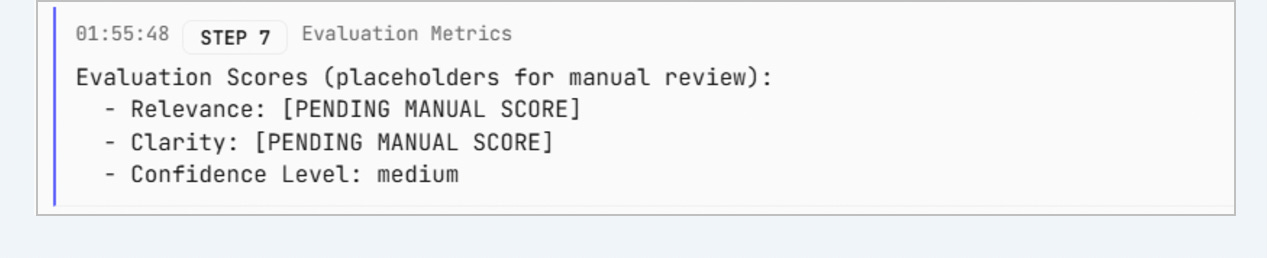
Once the output passes validation, the system evaluates quality signals.
These include relevance, clarity, and the confidence level reported by the model itself.
At this stage, evaluation may still involve manual scoring or placeholders. That is intentional. The architecture separates generation from judgment so that evaluation can later be automated, expanded, or audited without changing how responses are produced.
This is how prototypes evolve into reliable systems rather than fragile demos.
Step 8: Cost and latency measurement
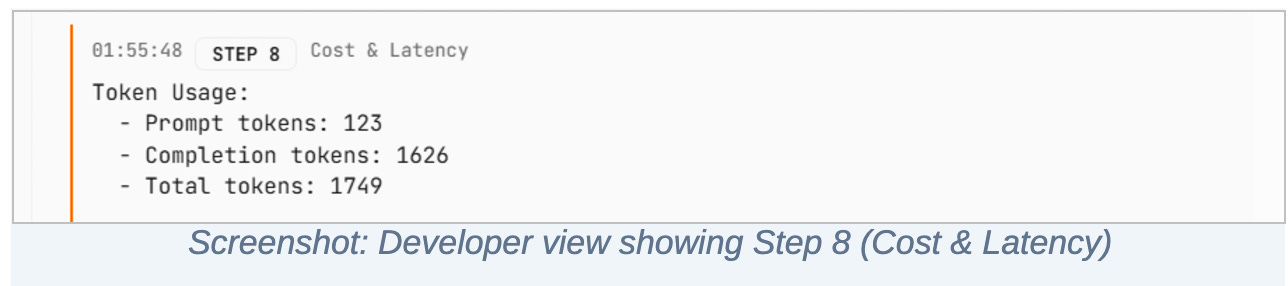
The system records token usage and total response time.
This step ensures that performance and economics are visible from day one. Cost and latency are not optimization concerns to be deferred; they are constraints that shape whether a product is viable at all.
By measuring them during prototyping, the system prevents teams from falling in love with behavior that cannot scale.
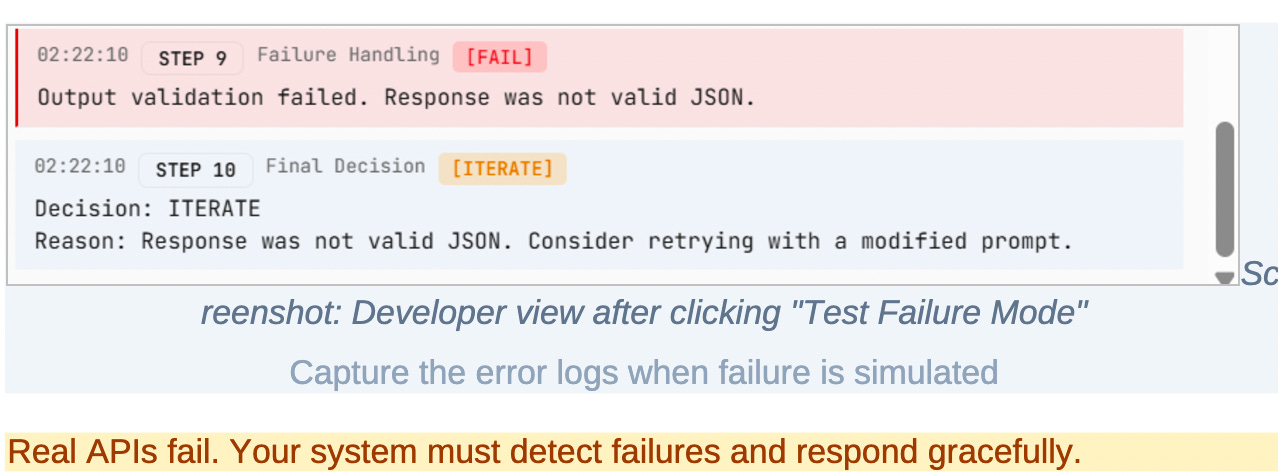
Step 9: Failure handling
The system explicitly handles failure scenarios.
If the input is ambiguous, if validation fails, or if the model produces unusable output, the system logs a clear failure state and continues operating without crashing.
This step reflects a core truth about AI systems: failure is not exceptional. It is expected. Designing for graceful failure is part of building user trust and operational stability.
Step 10: Final decision
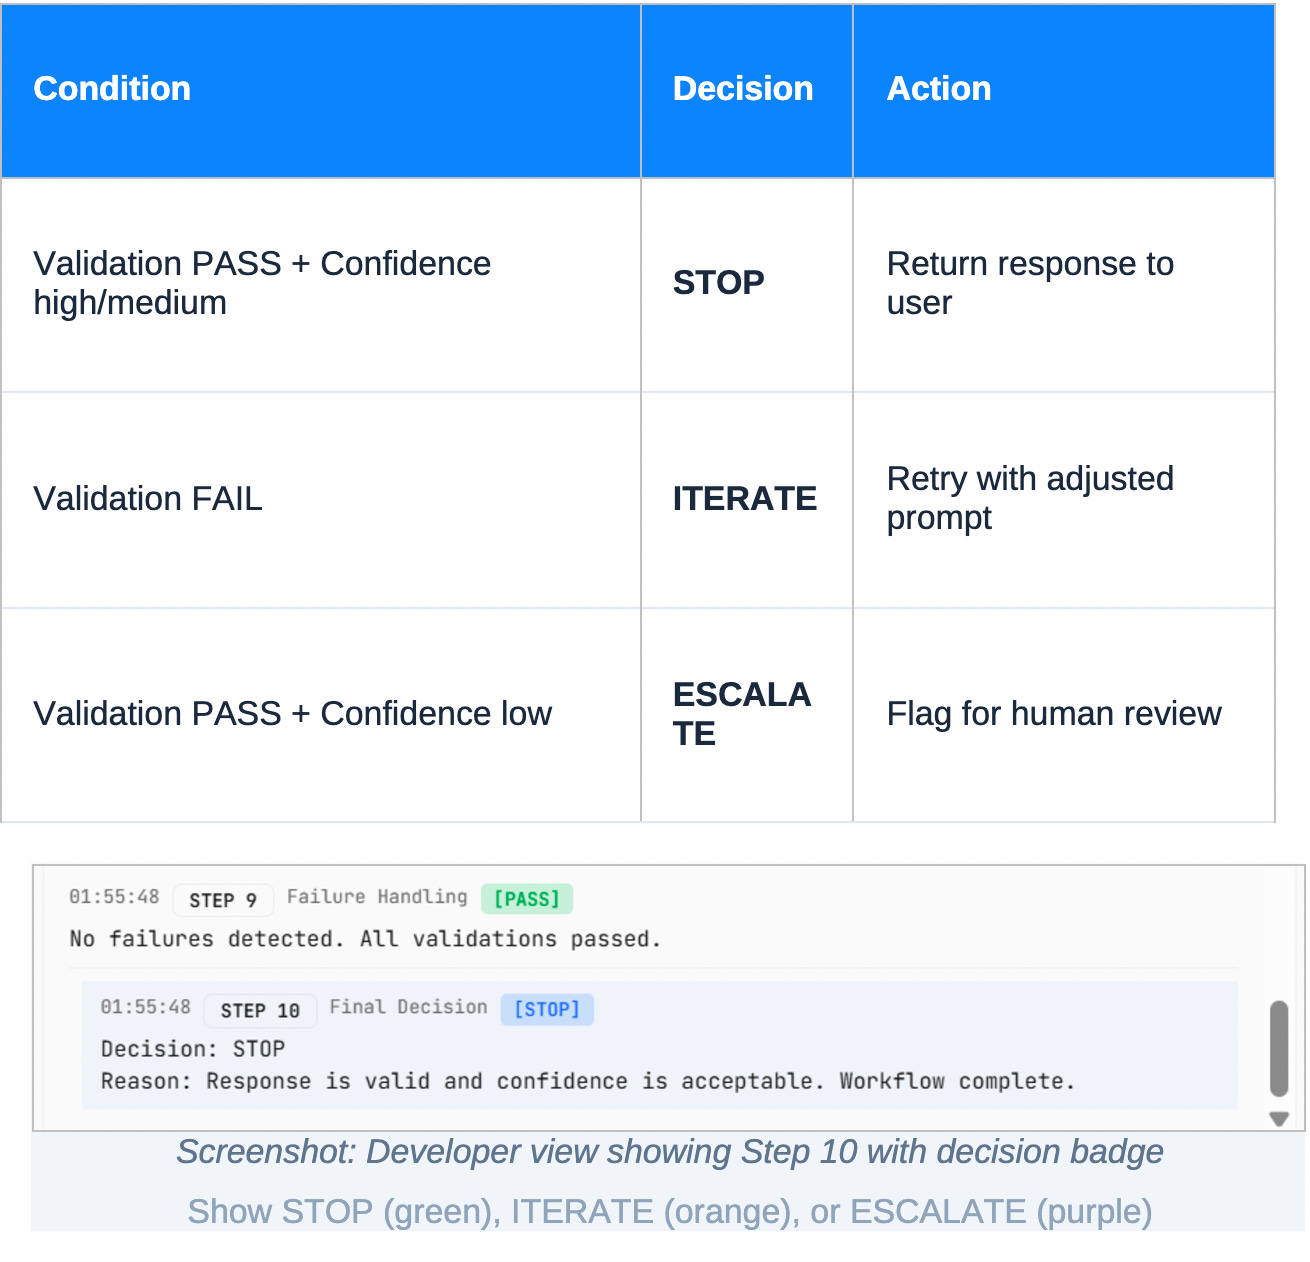
Every execution ends with a clear decision.
If validation passes and confidence is acceptable, the system stops and returns the response.
If validation fails, the system iterates by adjusting prompts or logic.
If confidence is low despite valid structure, the system escalates for human review.
This step closes the loop. The AI system is no longer just generating content; it is participating in a controlled decision process. It knows when to answer, when to retry, and when to defer.
What this prototype demonstrates
By the end of this process, we haven’t just built an AI assistant.
We’ve proven that:
AI behavior can be observed
Outputs can be validated
Quality can be evaluated
Cost and latency can be measured
Failure can be handled intentionally
Product decisions can be made with evidence
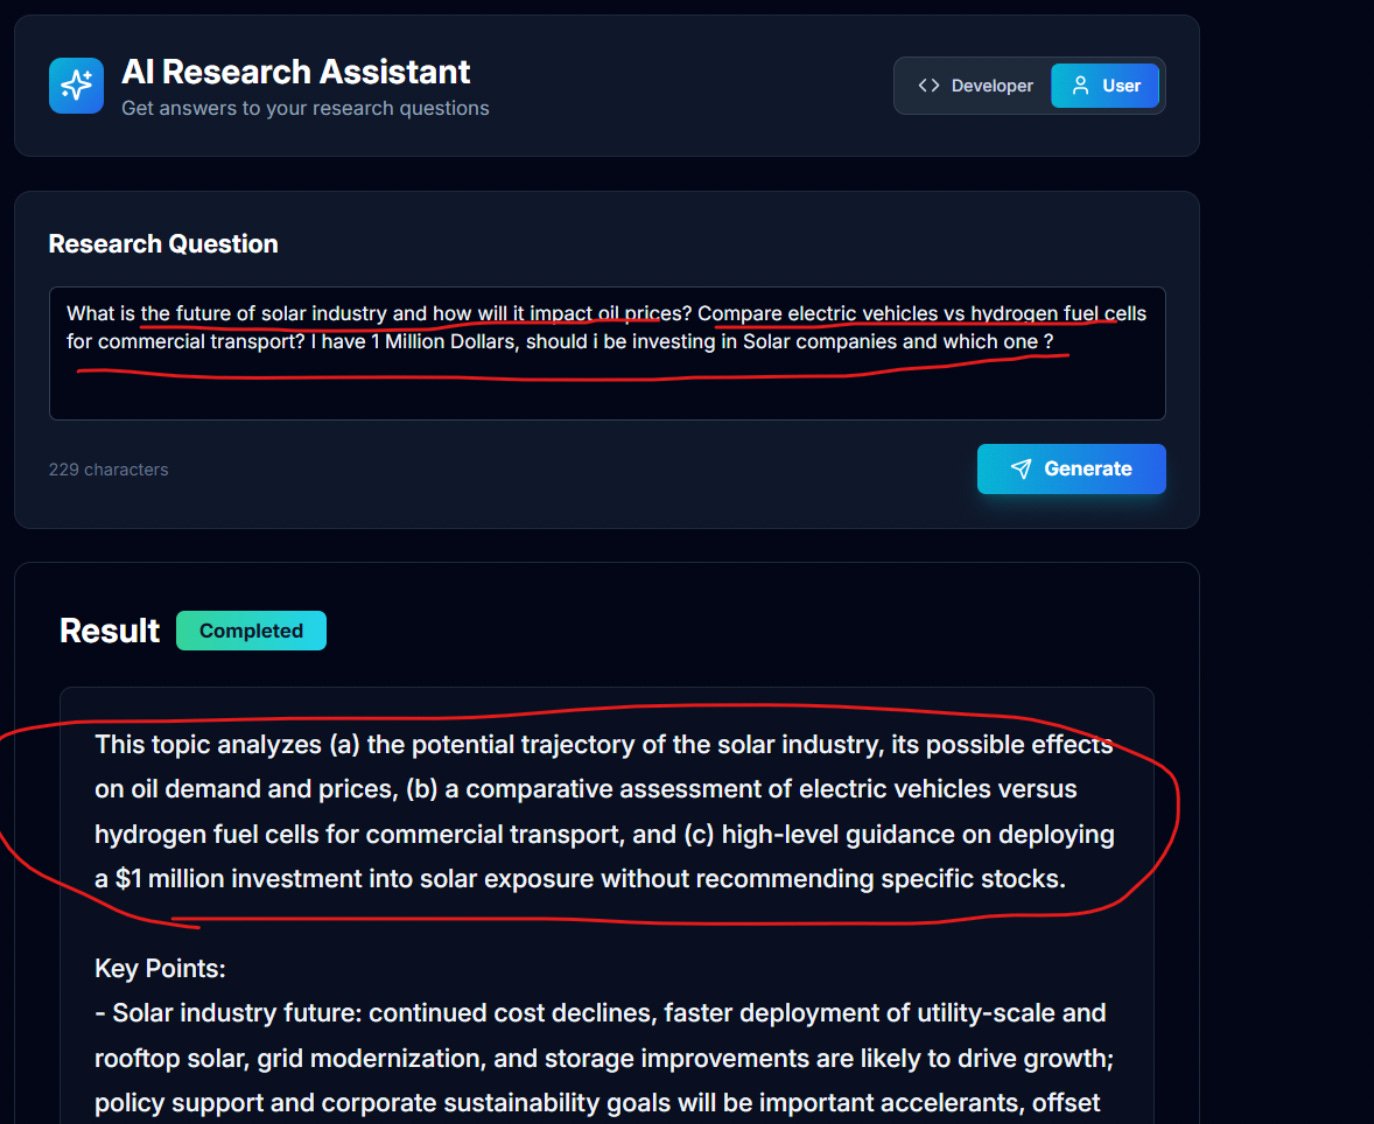
Real Time Output of our prototype:
I hope you loved it!
As I said, we’re already working on the advanced guide with more complex flow for AI prototyping.
Is there anything you’d like us to build specifically?
Any workflow? Any product clone to show you how it’s all done?
We would do it for you :))))
Enjoy.
Want to build AI products, not just read about them?
Become a Fellow